In this series’s previous post, we have seen how to create and execute a machine learning experiment in AzureML. Our experiment was not an actual ML experiment but a simple script that printed a message.
This post will see how to create and execute an ML experiment that involves training a model. It is important to note that this post is just the first step in creating a proper ML pipeline in AzureML and is therefore not the best of solutions. In future posts, we will continue improving this process and build a better ML pipeline in AzureML.
This post will also show how we can provide parameters to the experiment, which is useful when we want to train a model with different hyperparameters. In this case, we pass the Dataset to the experiment as a parameter.
Situation
We will consider the Concrete Compressive Strength Data Set from UCI Machine Learning Repository. The data set contains the following features:
| Feature | Description | Units | Type |
|---|---|---|---|
| Cement (component 1) | quantitative | kg in a m3 mixture | Input Variable |
| Blast Furnace Slag (component 2) | quantitative | kg in a m3 mixture | Input Variable |
| Fly Ash (component 3) | quantitative | kg in a m3 mixture | Input Variable |
| Water (component 4) | quantitative | kg in a m3 mixture | Input Variable |
| Superplasticizer (component 5) | quantitative | kg in a m3 mixture | Input Variable |
| Coarse Aggregate (component 6) | quantitative | kg in a m3 mixture | Input Variable |
| Fine Aggregate (component 7) | quantitative | kg in a m3 mixture | Input Variable |
| Age | quantitative | Day (1~365) | Input Variable |
| Concrete compressive strength | quantitative | MPa | Output Variable |
The Dataset has, therefore:
- 8 input variables (features)
- 1 output variable (labels)
- all the data is numerical
- feature and label names are pretty long
- 1030 instances in the Dataset
- no missing values in the Dataset
There are many versions of this Dataset, and to load it directly, we have selected a csv version
Loading the data into an AzureML dataset
from azureml.core import Workspace, Dataset
import os
import azuremlproject.constants as constants

def setup_experiment():

    config_path = os.path.join(os.path.dirname(os.path.realpath(__file__)), '.azureml')
    ws = Workspace.from_config(path=config_path)

    concrete_data_path =
    'https://raw.githubusercontent.com/stedy/Machine-Learning-with-R-datasets/master/concrete.csv'

    data_set = Dataset.Tabular.from_delimited_files(concrete_data_path)
    data_set.register(
        workspace=ws,
        name=constants.DATASET_NAME,
        description='concrete dataset',
        create_new_version=True)


if __name__ == '__main__':
    setup_experiment()
We will create a dataset directly from a web file by providing the data URL and calling Dataset.Tabular.from_delimited_files. We then register the Dataset in the workspace, and we can use it in our experiment.
The experiment
We will be using scikit learn for this experiment. We will compare two regression algorithms to determine the best one for the concrete strength Dataset prediction. The process employed is relatively straightforward:
- We use argparse to parse the command line arguments and retrieve the Dataset.
- We use the train_test_split function from scikit learn to split the data into training and test sets.
- We create a scikit learn pipeline that contains the following steps:
- RobustScaler: This is a robust scaler that scales the data to have a mean of 0 and a standard deviation of 1.
- LinearRegression: This step fits a linear regression model to the training data. We create another pipeline that contains the following steps:
- RobustScaler: This is a robust scaler that scales the data to have a mean of 0 and a standard deviation of 1.
- SVR: This step fits a support vector regression model to the training data.
- we use KFold to split the test data into ten folds.
- We use the cross_val_score function from scikit learn to evaluate the performance of the two models.
- We print the results of the cross-validation.
The code for this experiment is below. We should remember that the code is not the best way to create an ML pipeline in AzureML. In future posts, we will continue improving this process and build a better ML pipeline in AzureML.
'''
test and compare the predictive performance of various ML Models using the amount of explained variance
(in percentage) as an evaluation metric. ML Models used for comparison are:

- Linear Regression
- SVR
'''

import argparse
from asyncio.proactor_events import constants
import pandas as pd
from sklearn.model_selection import train_test_split    # pyright: reportMissingImports=false
from sklearn.preprocessing import RobustScaler          # pyright: reportMissingImports=false
from sklearn.pipeline import Pipeline
from sklearn.linear_model import LinearRegression
from sklearn.svm import SVR
from sklearn.model_selection import KFold
from sklearn.model_selection import cross_val_score
from azureml.core.dataset import Dataset
from azureml.core.run import Run

run = Run.get_context()
ws = run.experiment.workspace

parser = argparse.ArgumentParser()
parser.add_argument(
    '--dataset_name',
    type=str,
    help='Name of the dataset to use'
)
args = parser.parse_args()

dataset = Dataset.get_by_name(ws, args.dataset_name)

df_orig = dataset.to_pandas_dataframe()

df_orig.columns = [
    'cement',
    'slag',
    'ash',
    'water',
    'superplastic',
    'coarseagg',
    'fineagg',
    'age',
    'strength']

# create features and labels datasets
X = df_orig.drop('strength',axis=1)
y = df_orig['strength']


print('X.shape:', X.shape)
print('y.shape:', y.shape)

# split into test and train sets
X_train, X_test, y_train, y_test = train_test_split(X, y, test_size=0.2, random_state=42)

# create a pipeline for each regressor
# pipline will contain the regressor preceeded by a scaler
# all pipelines are stored in a list
pipelines = []
pipelines.append((
    'Linear Regression',
    Pipeline([('scaler',RobustScaler()),('LR',LinearRegression())])))
pipelines.append((
    'SupportVectorRegressor',
    Pipeline([('scaler',RobustScaler()),('SVR',SVR())])))


# Create empty dataframe to store the results
result_train = pd.DataFrame({'Regressor':[],'VarianceScore':[],'StdDev':[]})

# Let's find and store the cross-validation score for each
# pipeline for training data with raw features.

for ind, val in enumerate(pipelines):
    name, pipeline = val
    kfold = KFold(n_splits=10,random_state=2020, shuffle=True)
    cv_results = cross_val_score(
        pipeline,
        X_train,
        y_train,
        cv=kfold,
        scoring='explained_variance')
    result_train.loc[ind] = [name,cv_results.mean()*100,cv_results.std()*100]


print(result_train)
Experiment Execution
To execute this experiment, we need to create an environment in AzureML that contains scikit learn and pandas. We will be using the Environment.from_pip_requirements function to create the environment discussed in the previous post. The requirements file is as follows:
scikit-learn
pandas
azureml-core
azureml-dataset-runtime
Finally, we create the code to execute the experiment. We discussed the structure of the script previously. What is different is that we are passing the dataset name as an argument through the ScriptRunConfig instance. The arguments parameter of the ScriptRunConfig instance is a list containing the parameter name followed by the value.
from importlib.resources import path
from azureml.core import Workspace, Experiment, ScriptRunConfig, Environment, Dataset
import os
from azuremlproject import constants

def run_experiment():

    config_path = os.path.join(os.path.dirname(os.path.realpath(__file__)), '.azureml')
    ws = Workspace.from_config(path=config_path)

    # This is the configuration for the experiment. It tells the experiment what code to run, where to run
    # it, and what compute target to use.
    config = ScriptRunConfig(
        source_directory=os.path.join(os.path.dirname(os.path.realpath(__file__)), 'experiment_4'),
        script='experiment_4.py',
        compute_target=constants.INSTANCE_NAME,
        arguments=[
            '--dataset_name', constants.DATASET_NAME
        ])

    env = Environment.from_pip_requirements(
        name='env-4',
        file_path=os.path.join(os.path.dirname(os.path.realpath(__file__)), 'experiment_4_req.txt')
    )
    config.run_config.environment = env


    experiment = Experiment(ws, constants.EXPERIMENT_NAME)
    run = experiment.submit(config)
    aml_run = run.get_portal_url()
    print(aml_run)

if __name__ == '__main__':
    run_experiment()
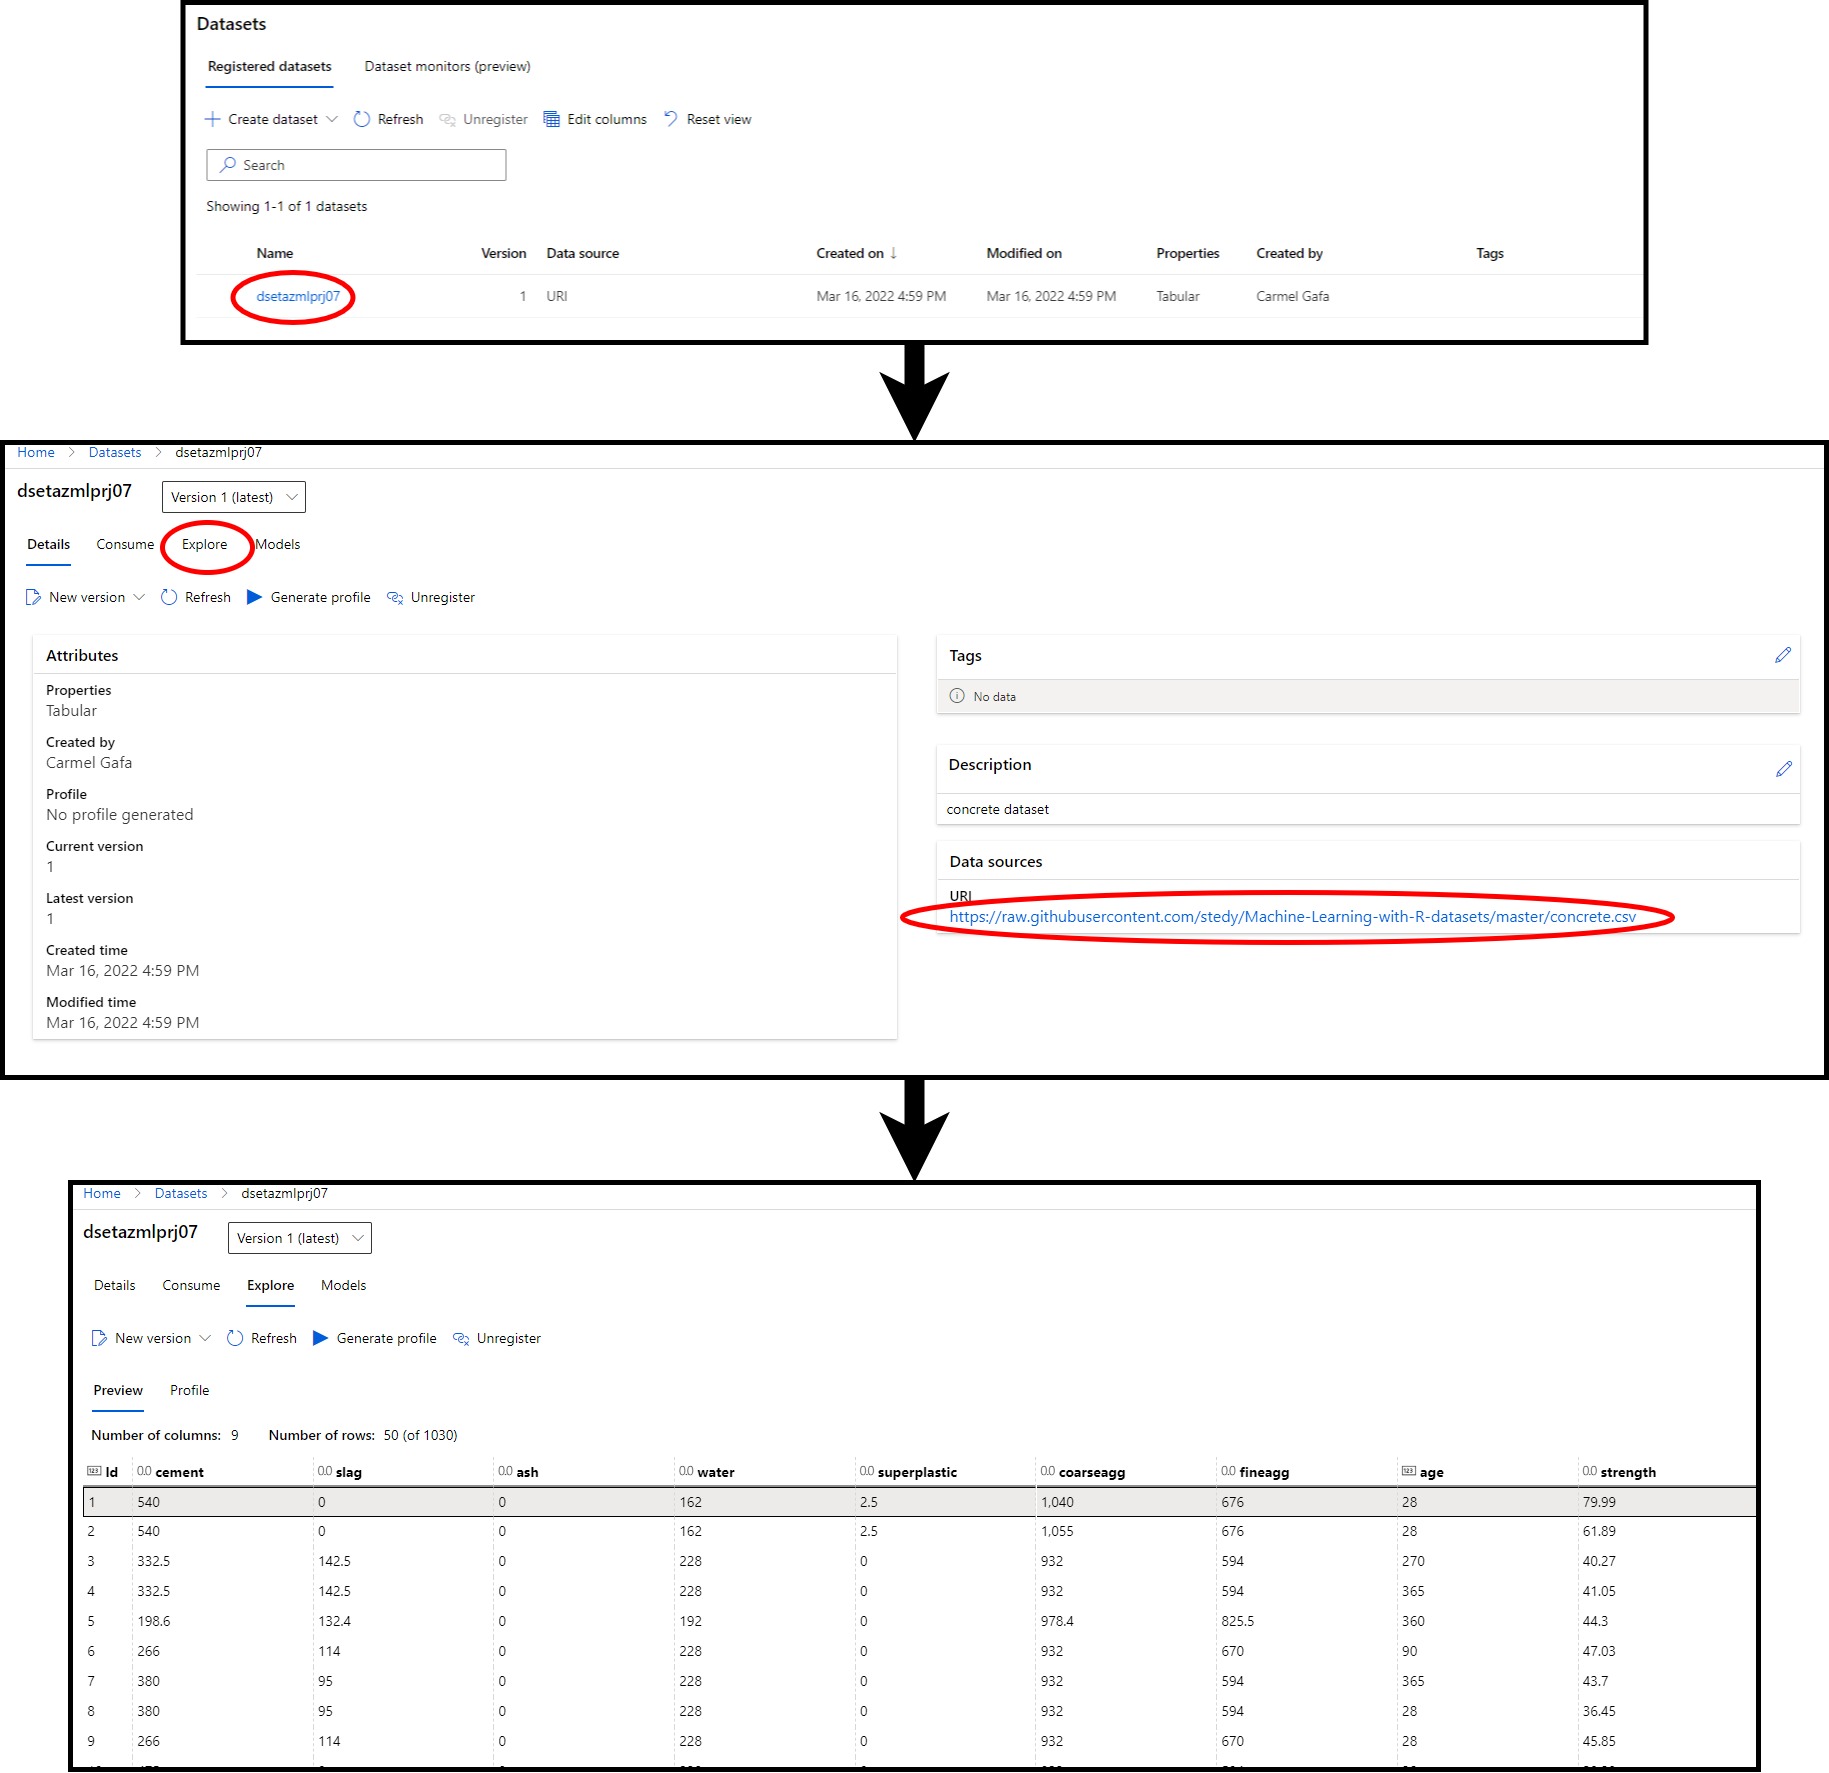
Execution starts with creating the Dataset as explained above. We can verify that the Dataset was created by navigating into the datasets folder in the workspace where we should see the Dataset. When clicking on the dataset name, we should see the following:
- Type; this is a tabular set
- Version; this is the Version of the Dataset, which is 1 in this case
- Description; this is the Description of the Dataset that we provided in the dataset creation
- URL; this is the URL of the Dataset
Of interest is the Explore page, where we can see the data in the Dataset.

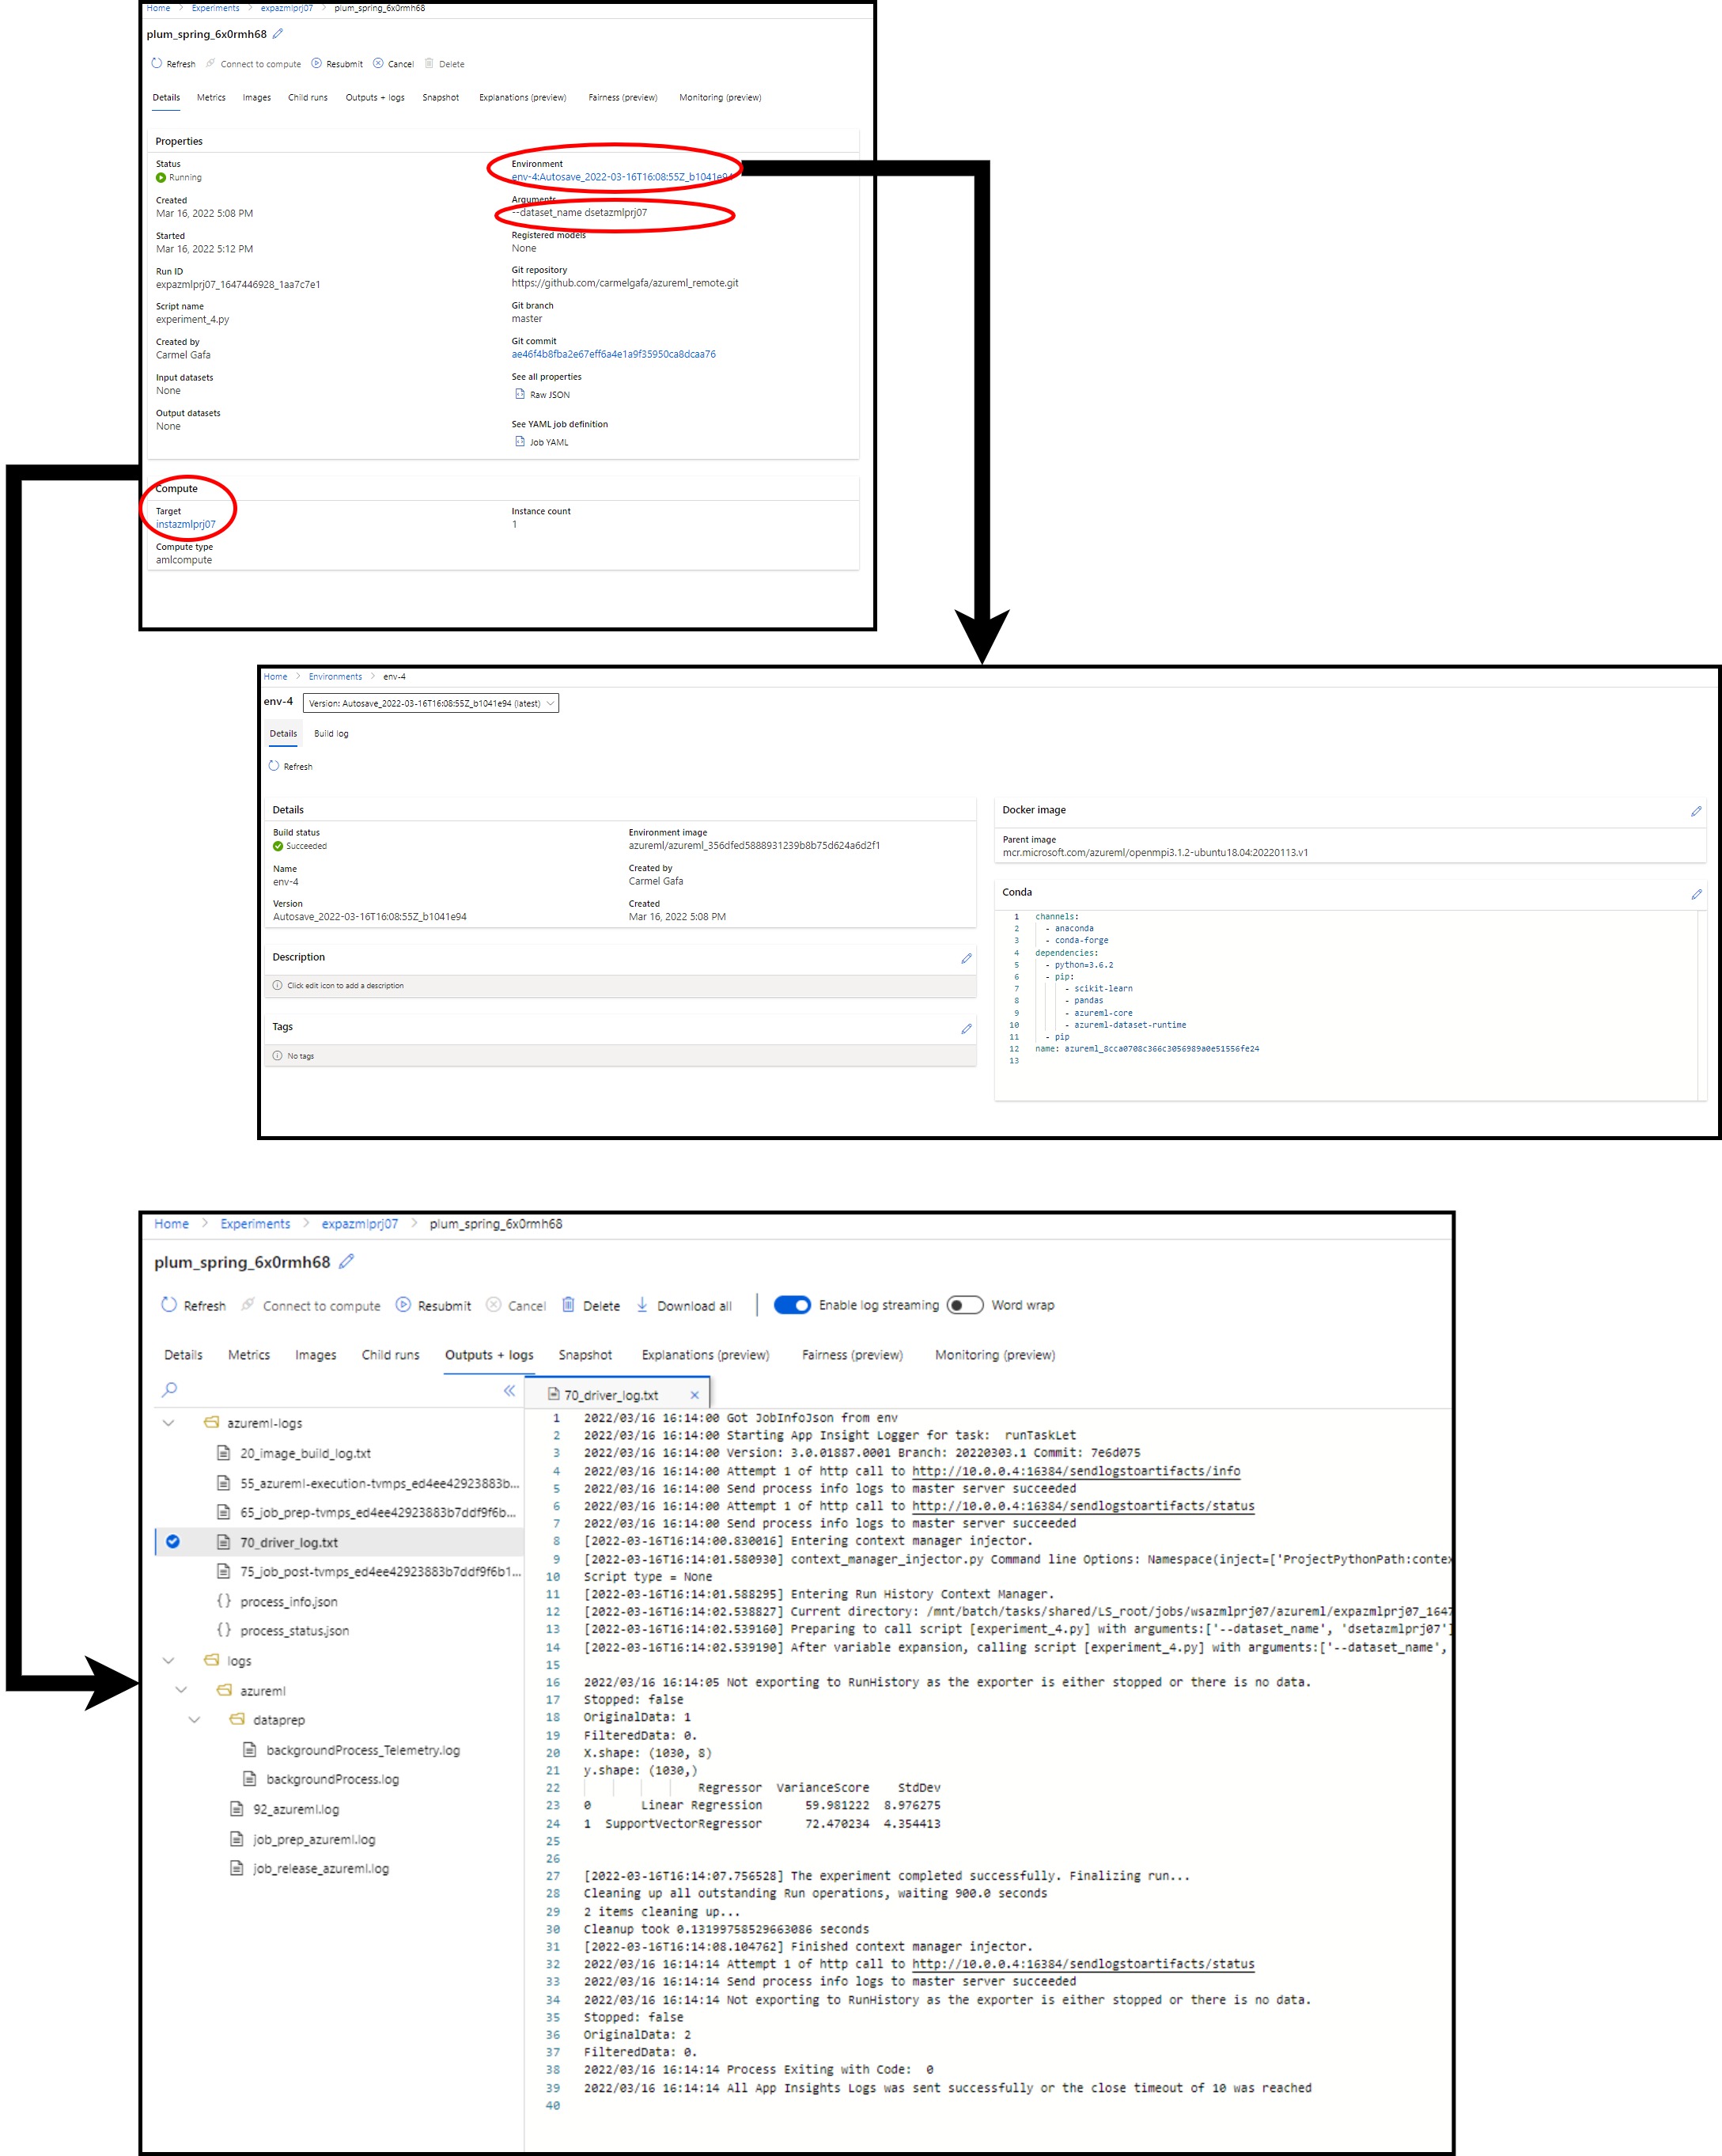
The experiment execution gives us a lot of information, including:
- The target compute target used for the experiment
- The arguments passed to the experiment
- The environment used for the experiment will link to more information about the docker image used for the experiment and the packages used in the environment

Once the experiment is executed, we can see the results in the logs. In this example, we can see the variance score and standard deviation of the two algorithms we used.
Conclusion
Although this is a simple example, it is an excellent example of how we can use Azure ML to train machine learning models. In the next post, we will look at using Azure ML to create pipelines to train machine learning models.